Opted for Presumptive Taxation Scheme: How you can file your ITR on your own

ITR-4: Step-By-Step Guide to File ITR-4 (Sugam)
ITR Form is filed by taxpayers who select a presumptive income scheme under Section 44AD, Section 44ADA, and Section 44AE of the Income Tax Act.
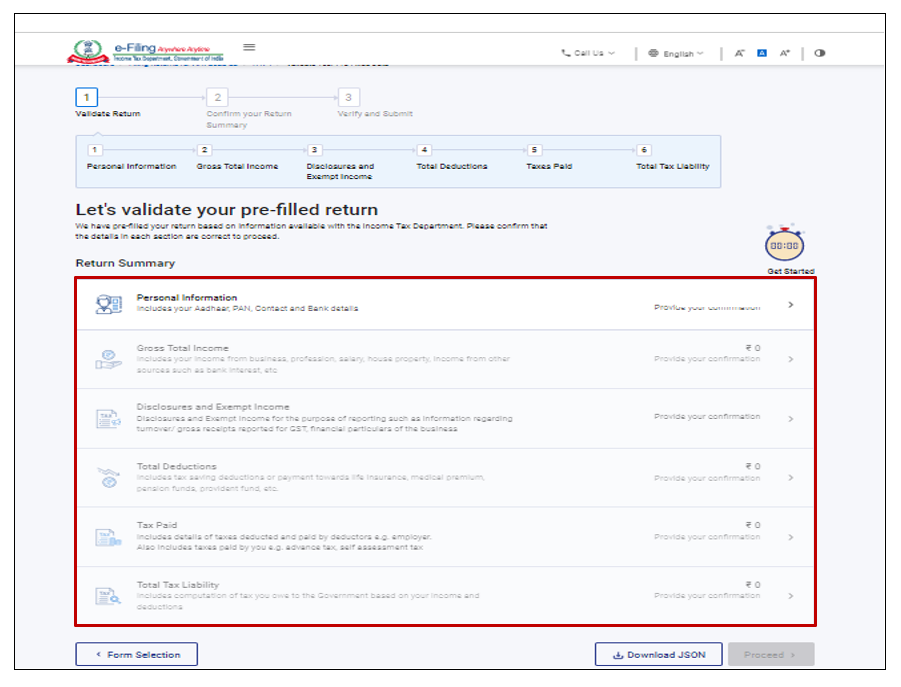
The ITR-4 includes six sections that are required to fill out before submitting the form in online mode, along with a preview page that allows you to validate your details, which you have filled in the return. These six sections are as follows:
- Personal Information
- Gross Total Income
- Disclosures and Exempt Income
- Total Deductions
- Taxes Paid
- Total Tax Liability
Taxpayers can file and submit their Income Tax Return (ITR) through two primary methods: online and offline. To file your ITR through online mode, you can use the e-Filing portal.
To file and submit your Income Tax Return (ITR) through online mode, follow these steps:
Step 1: Go to the official Income Tax Department’s e-Filing portal and log in using your user ID and password.
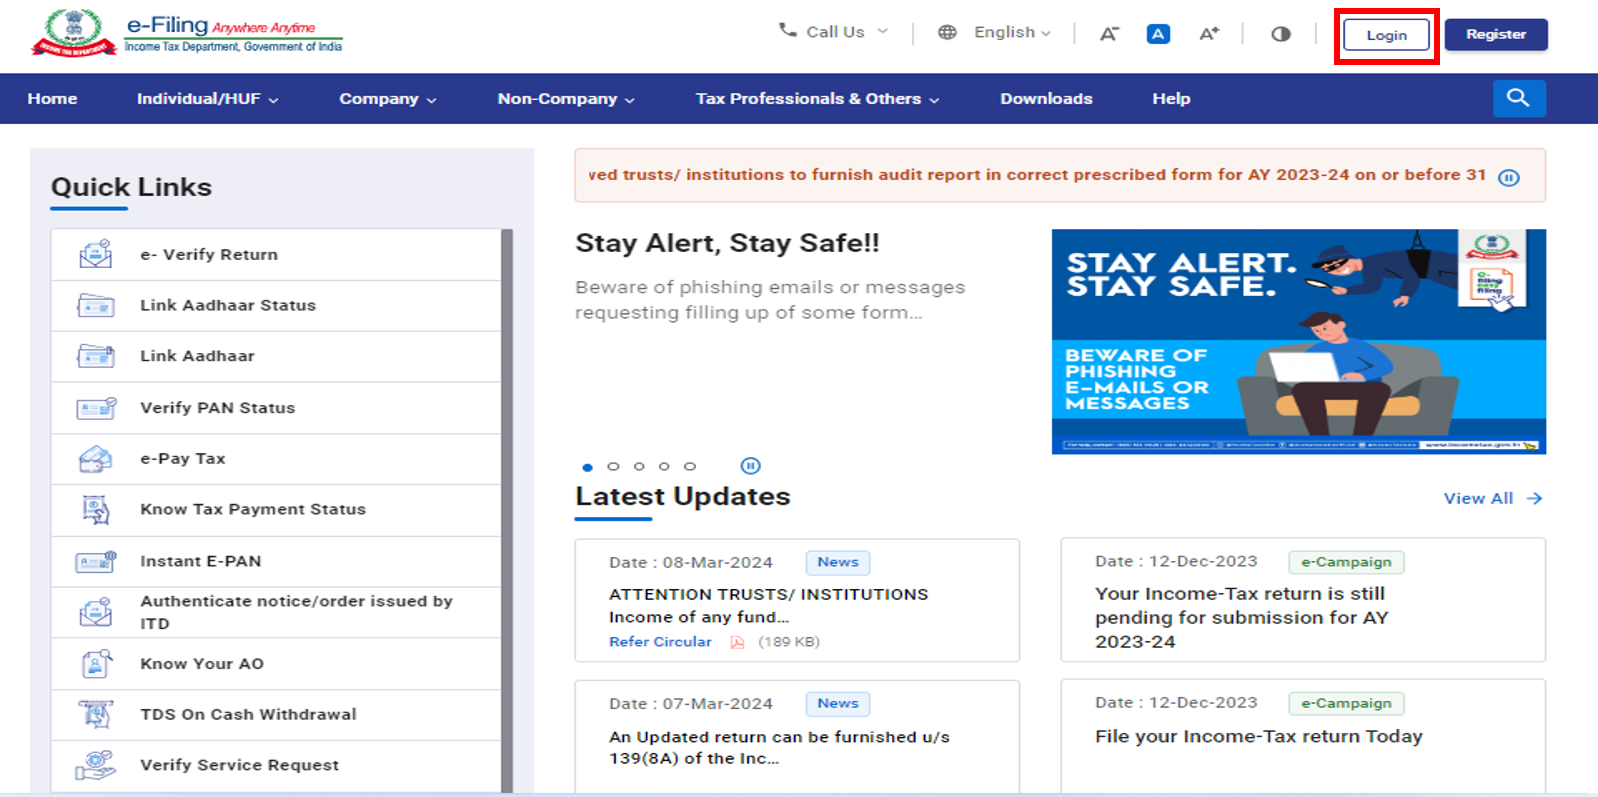
Step 2: On the top of your dashboard, click on ‘e-file’, then select ‘Income Tax Returns’ option, and lastly click on File Income Tax Return.

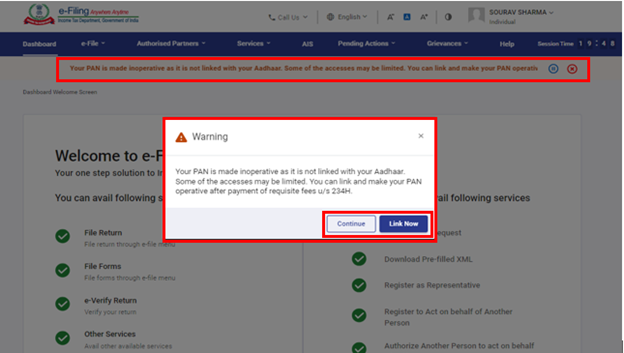
In case your PAN is inactive, a warning message will pop up saying that your PAN is inactive as it is not linked to your Aadhaar. To link your PAN with Aadhar, click on ‘Link Now’, otherwise, click Continue.
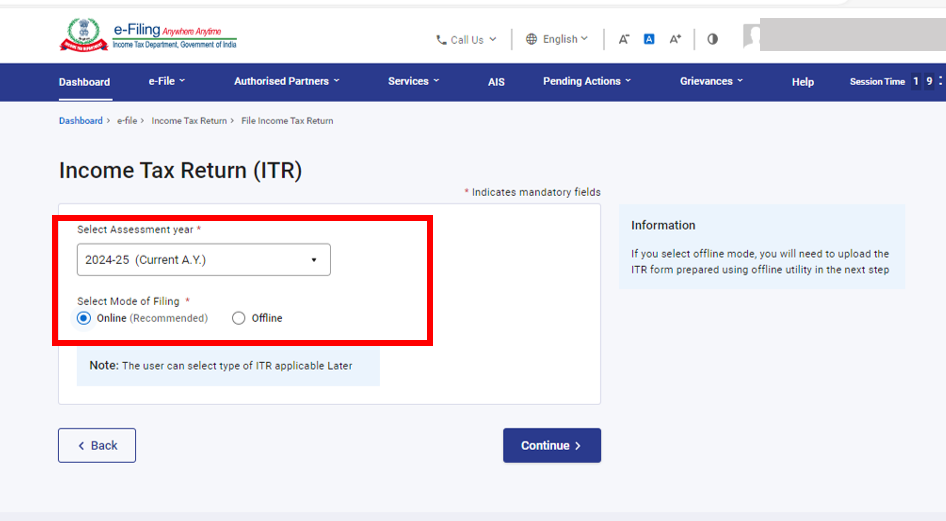
Step 3: Choose the applicable Assessment Year and mode of Filing as online and click on continue.
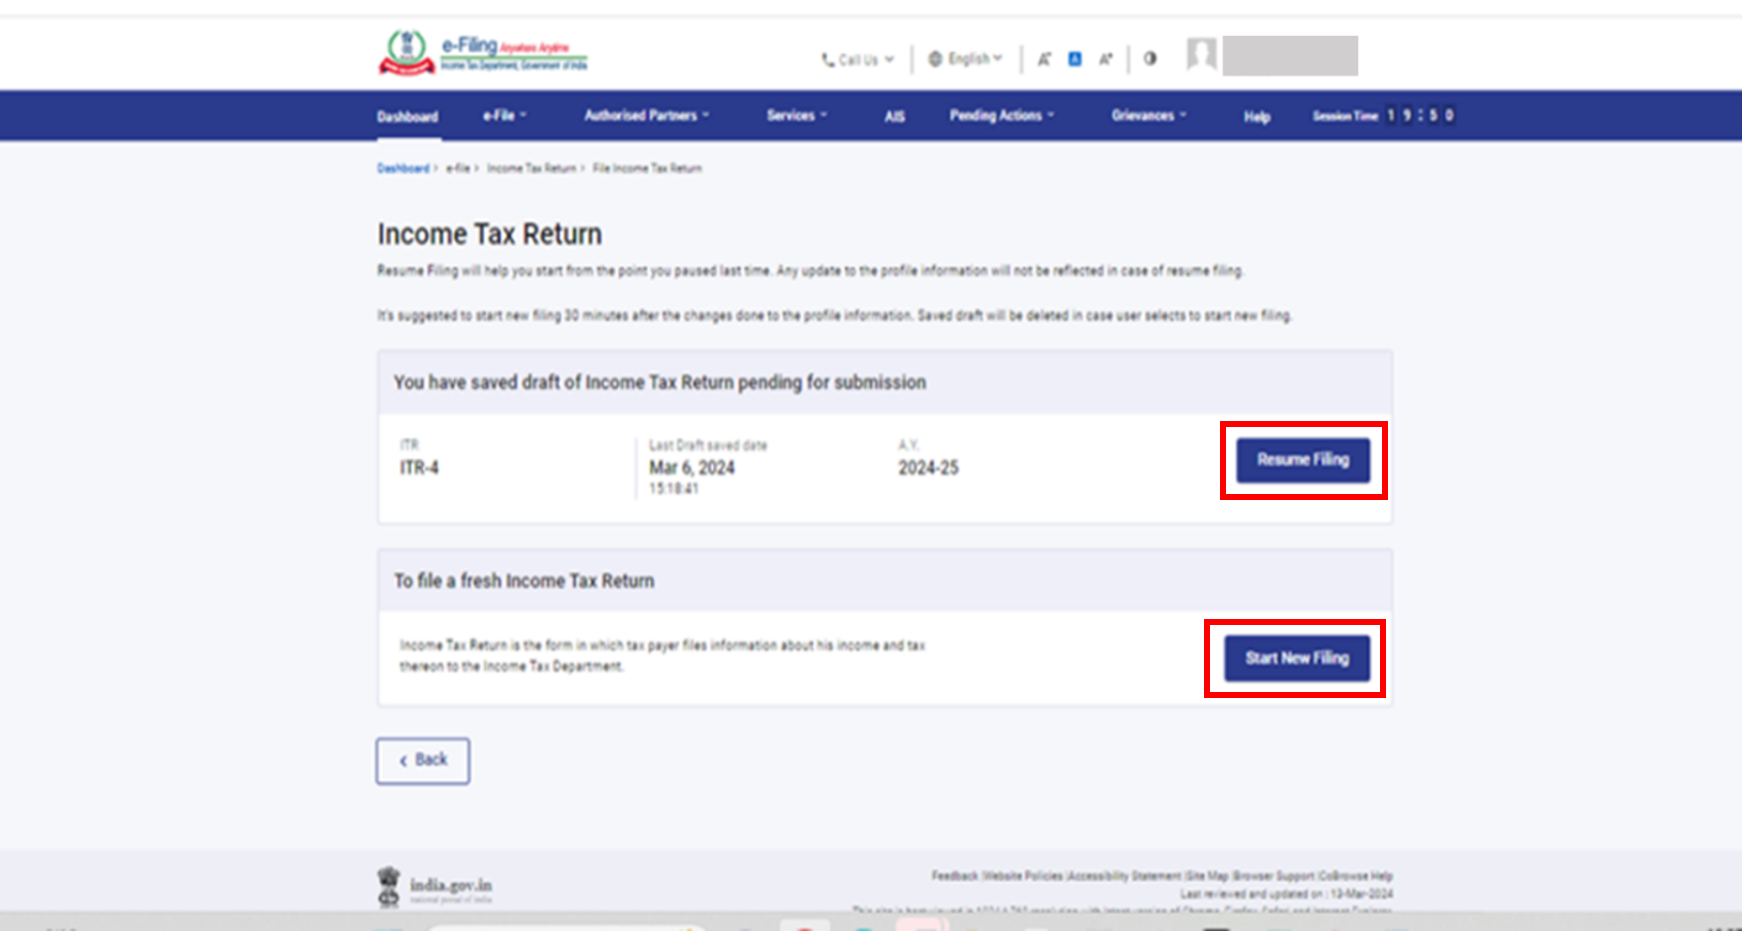
If you’ve already started filling out your Income Tax Return but haven’t submitted it yet, click Resume Filing. If you want to discard the saved details, click Start New Filing.
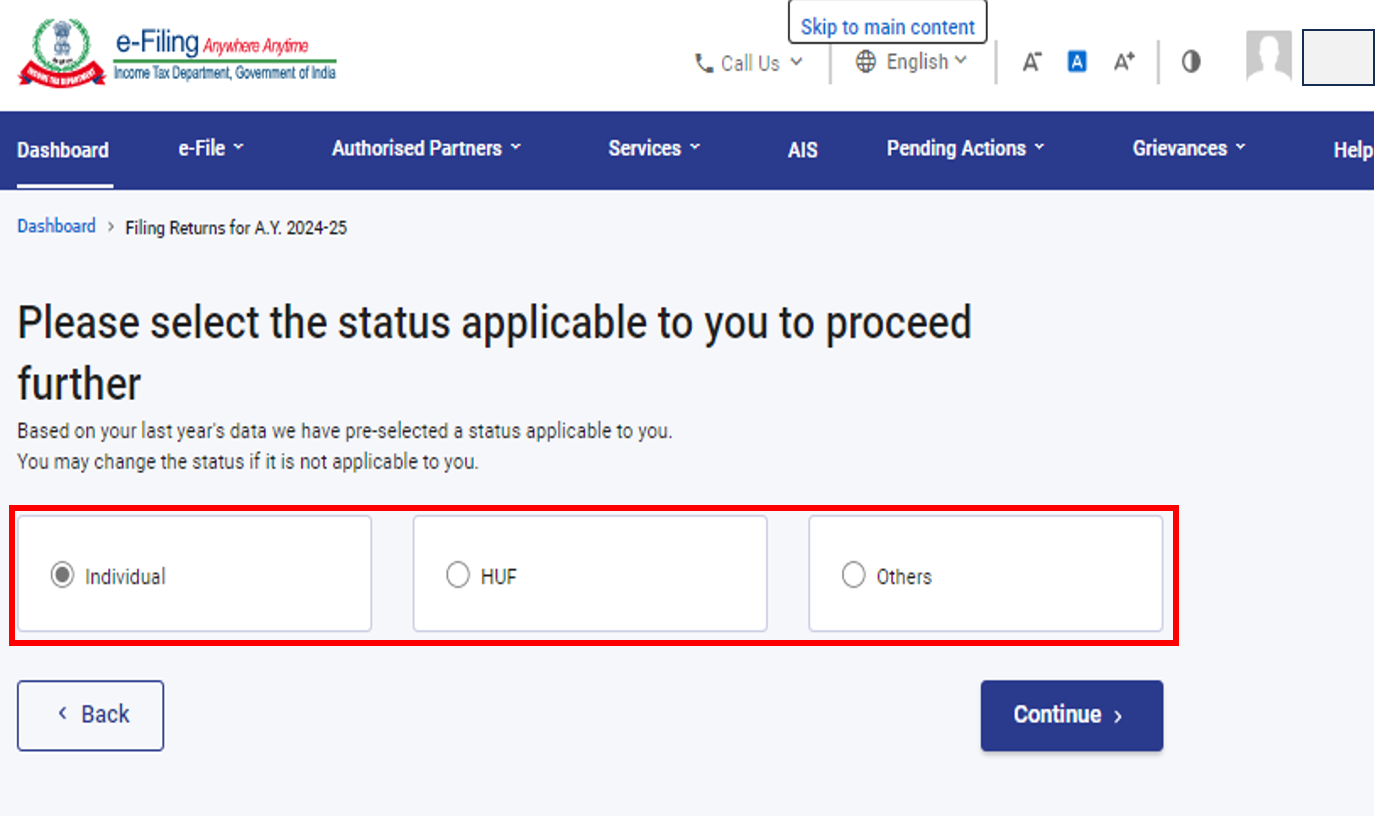
Step 4: You will be asked to select the status, i.e., whether you are an individual or HUF or others. After selecting the status, click on continue.
Step 5: You will be asked to choose the type of Income Tax Return. If you do not know which one to file, you can select ‘wizard-based return‘ filing by tapping on the proceed button. The system will help you determine the appropriate ITR. After knowing the correct ITR, continue filing your ITR.
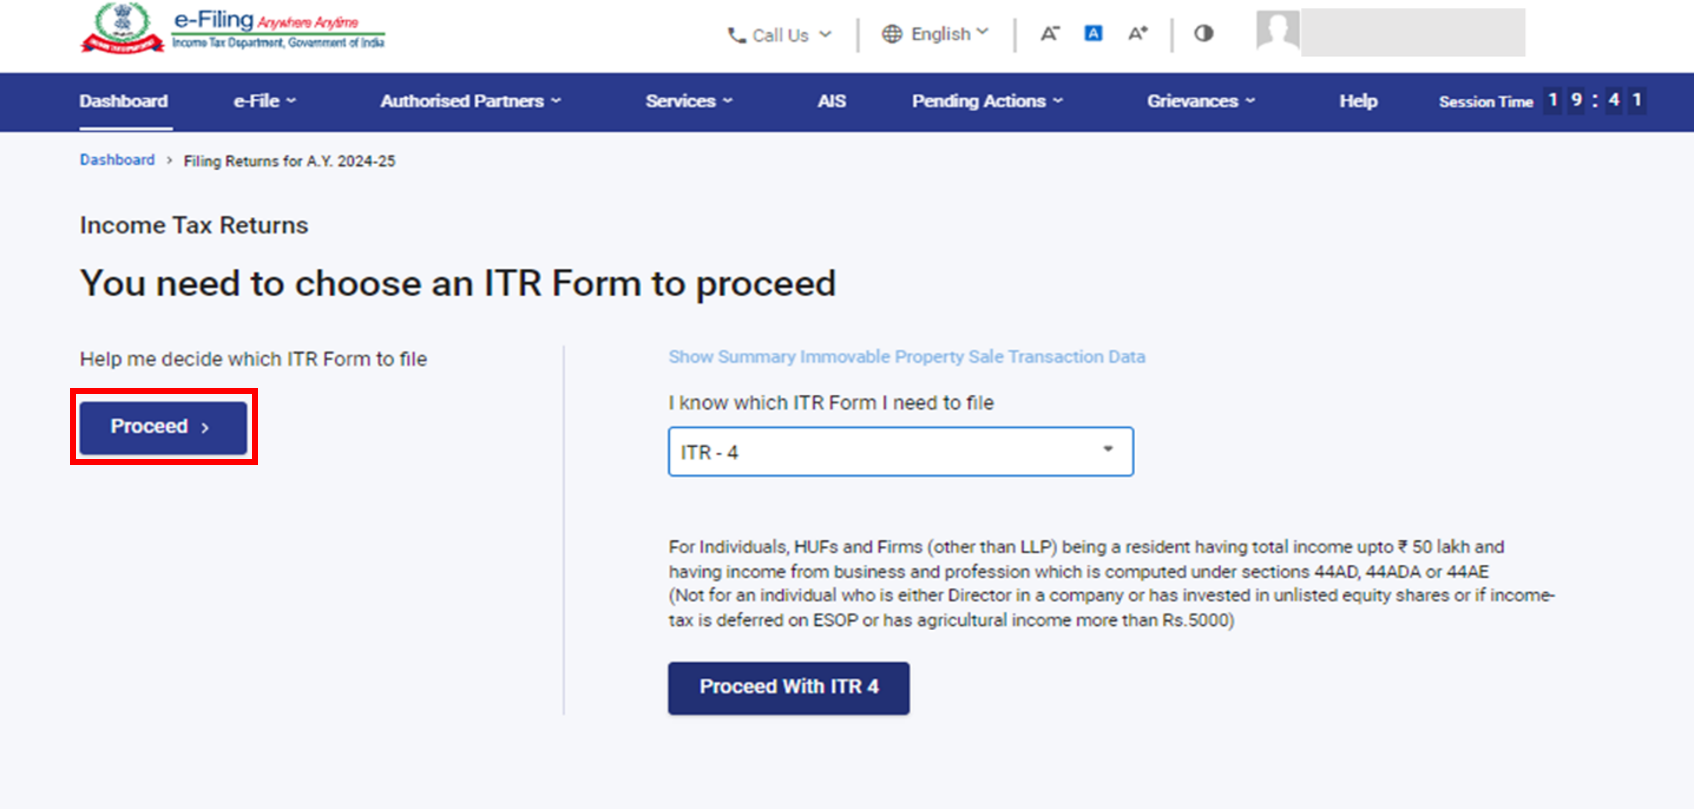
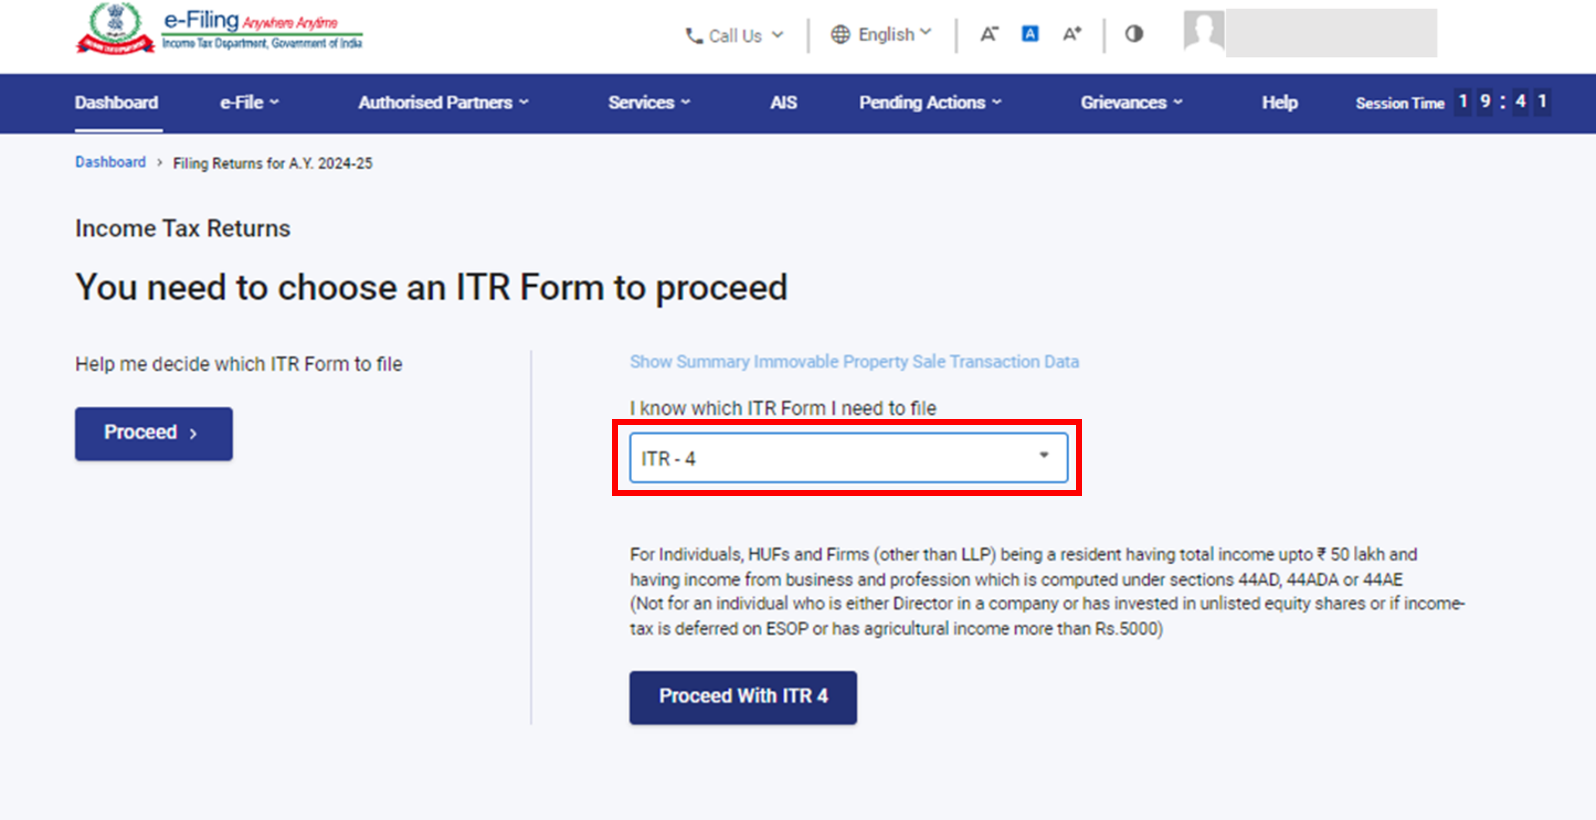
In case you already know which ITR to file, select the applicable Income Tax Return and click ‘Proceed with ITR-4‘.
If you’re unclear about your income and deductions, answering a set of questions will help you determine the right details and ensure error-free filing of your ITR. However, if you’re already aware of the applicable ITR form and schedules, or have your income and deductions details ready, you can skip the questionnaire and proceed directly.
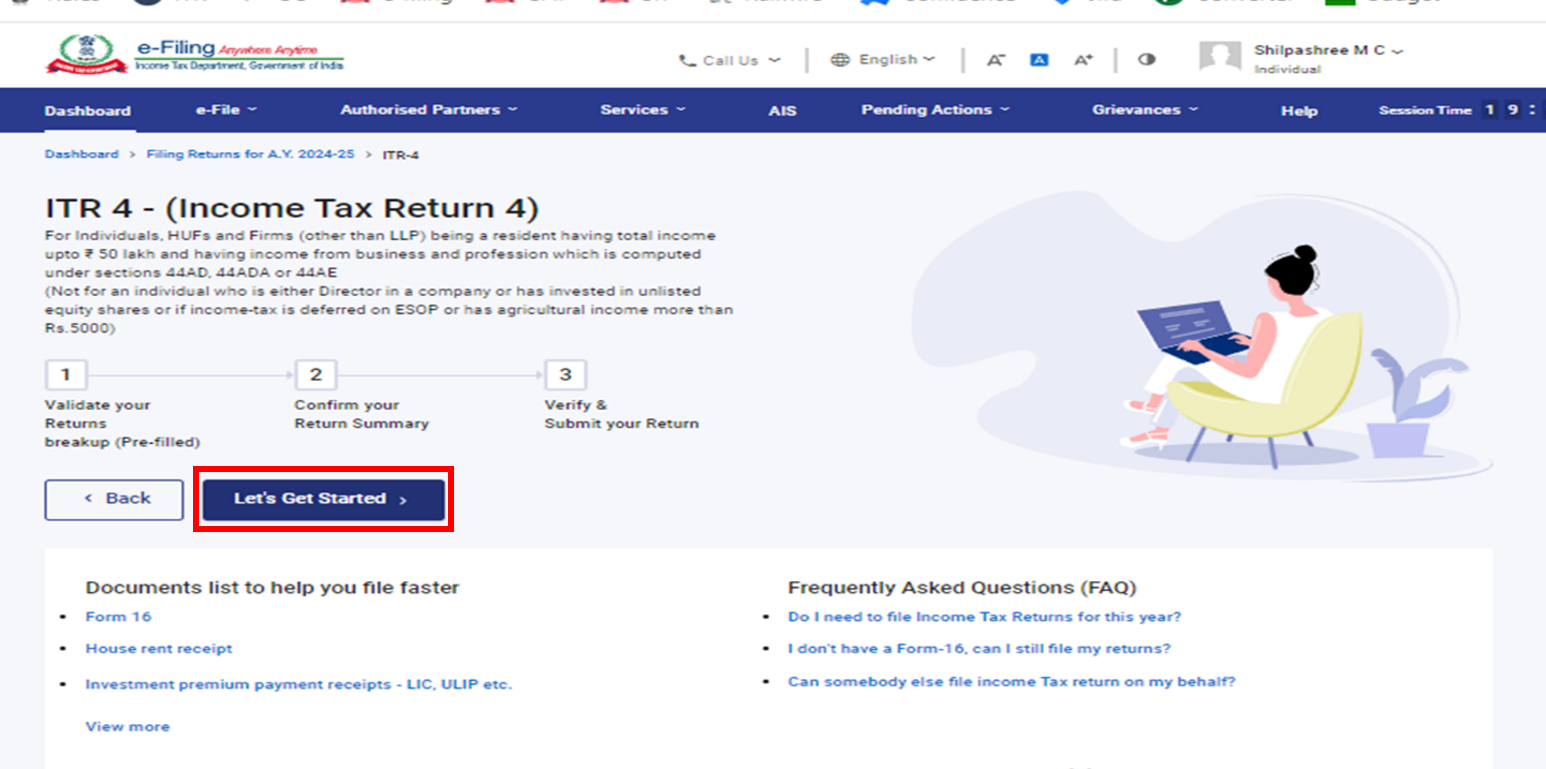
Step 6: Read the Instructions carefully for filling out the form and take note of the list of required documents. Once you’re ready, click ‘Let’s Get Started‘ to begin the process.
Step 7: Check your pre-filled data and modify details if needed. Enter the rest of the details and click Confirm at the end of each section.
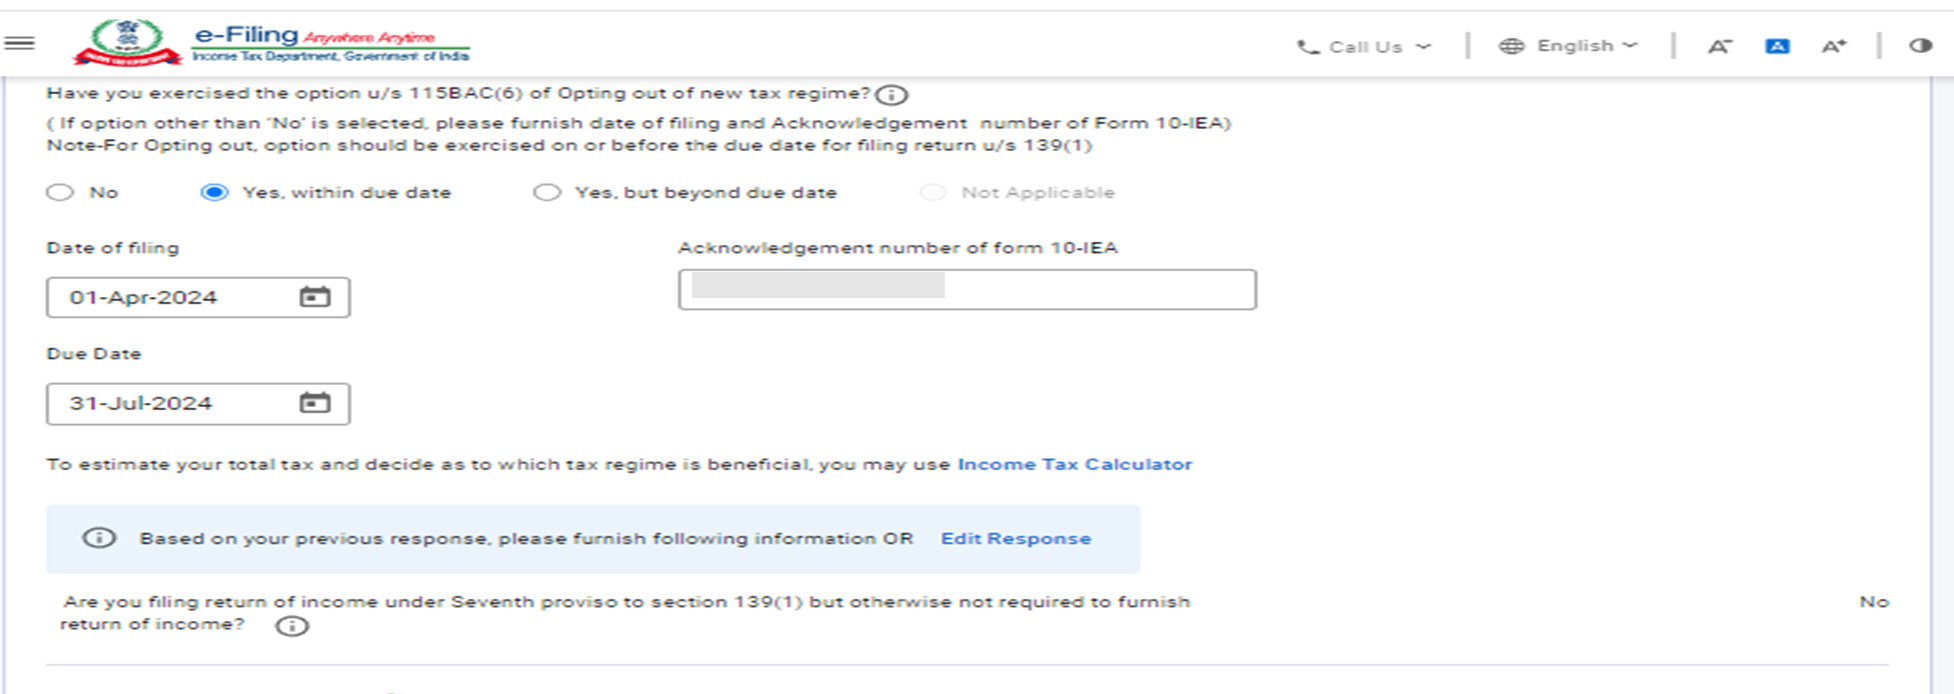
- The New Tax Regime is the default for individuals and HUFs. If someone wants to follow the Old Tax Regime, they must choose it on purpose.
- If a person has income from a business or profession, they can switch to the Old Tax Regime by filing Form 10-IEA on or before the due date under Section 139(1).
In the “Filing Section” of the Personal Information tab, the option “No” will be automatically selected by default.
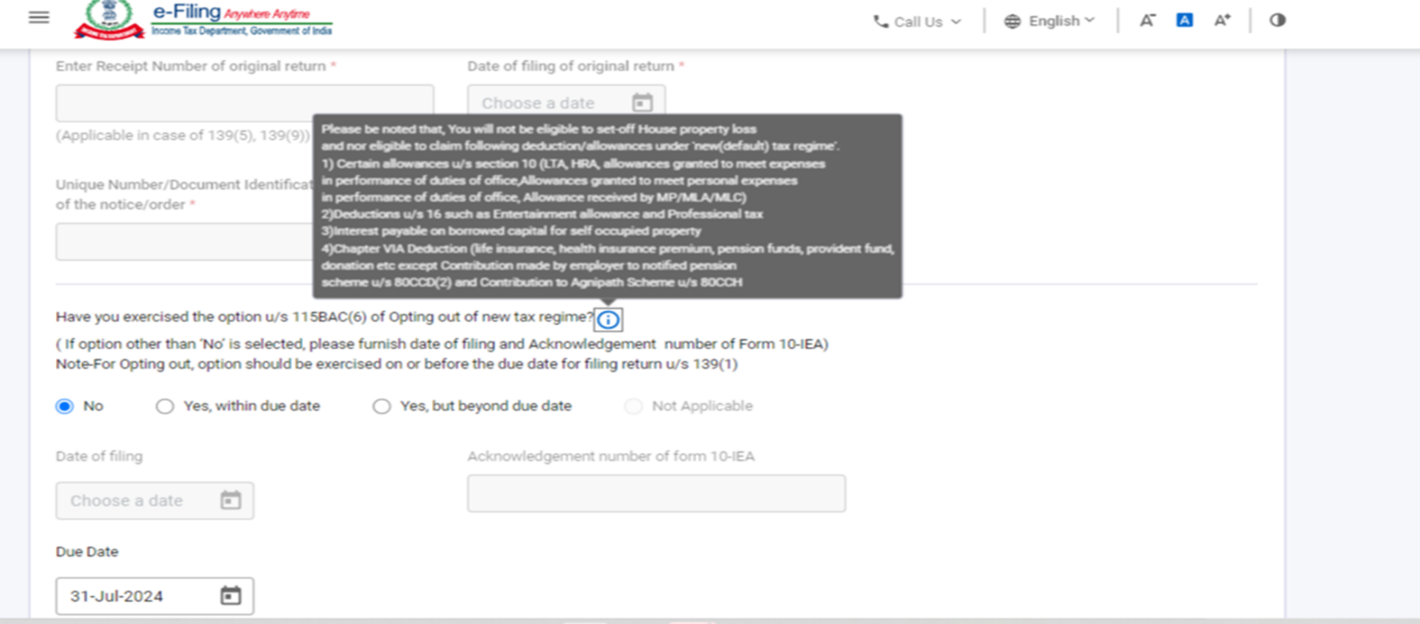
- If you want to select out of the New Tax Regime, select “Yes, within due date or Yes, but beyond due date“.
- If you select Yes, then fill in the date of filing and acknowledgement No. of Form 10-IEA and submit the due date applicable for filing of the return.
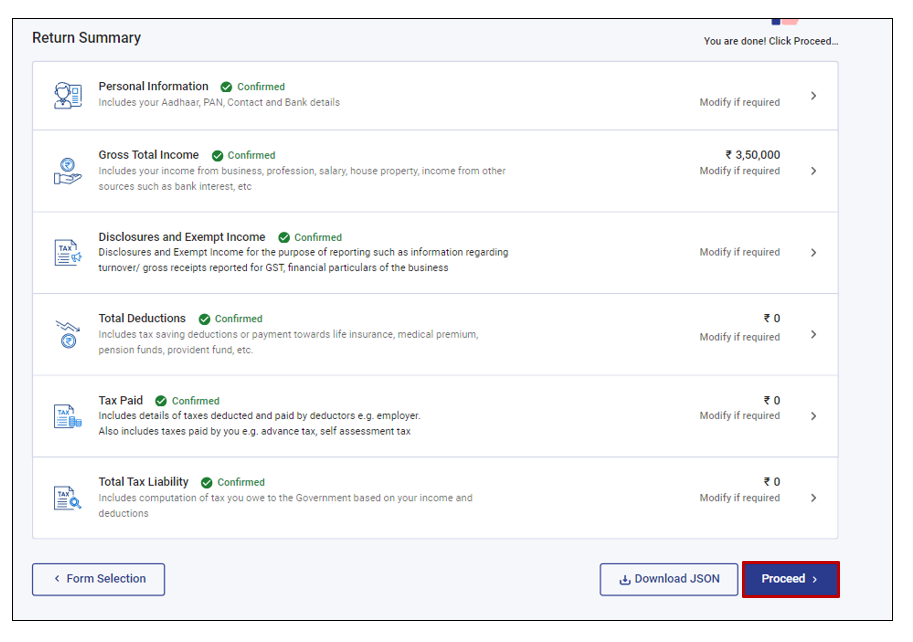
Step 8: Fill in your income and details about your deductions in the different sections. After being done with this, confirm all the sections of the form and click ‘proceed‘.
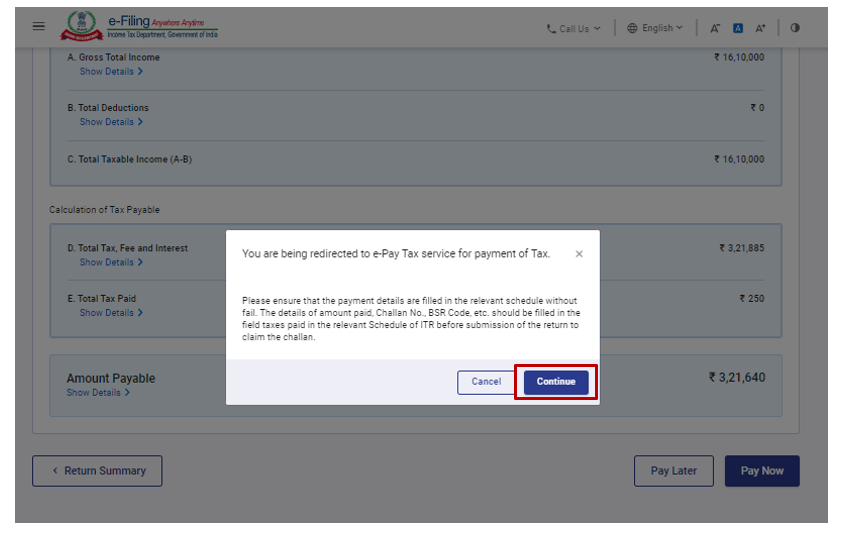
Step 9: You will see a summary of your tax calculation based on the details you have submitted. If you have any tax to pay, you will see “Pay Now” and “Pay Later” options at the bottom. It is recommended to choose the “Pay Now” option.
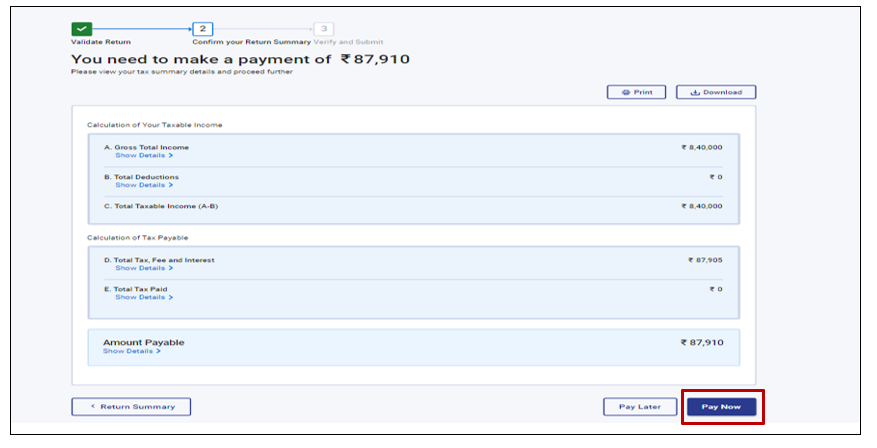
If you select to Pay Later, you can pay after filing your ITR. However, there is a risk of being treated as an assessee defaulter, and you may have to pay interest on the pending tax amount.
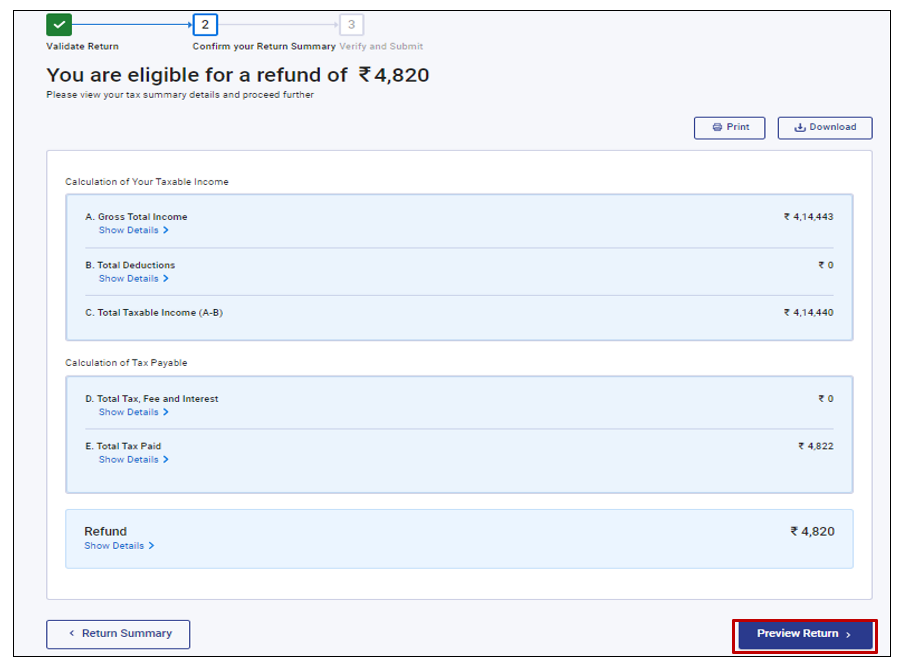
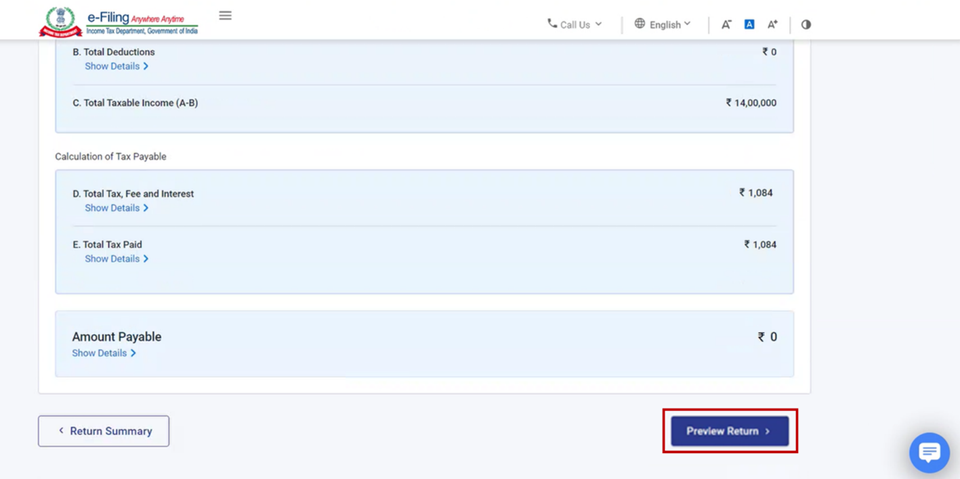
Step 10: After paying the tax, click on Preview Return. If there is no tax due or if you are eligible for a refund, you will be taken directly to the Preview Return page.
Step 11: After a successful payment on the e-Filing portal, a success message will appear. Click Back to Return Filing to continue and finish the filing of your ITR.

Step 12: Click on the Preview Return.
Step 13: On the Preview and Submit Your Return page, your Place, Name, and other details will be auto-filled. Select the declaration checkbox and click Proceed to Preview.
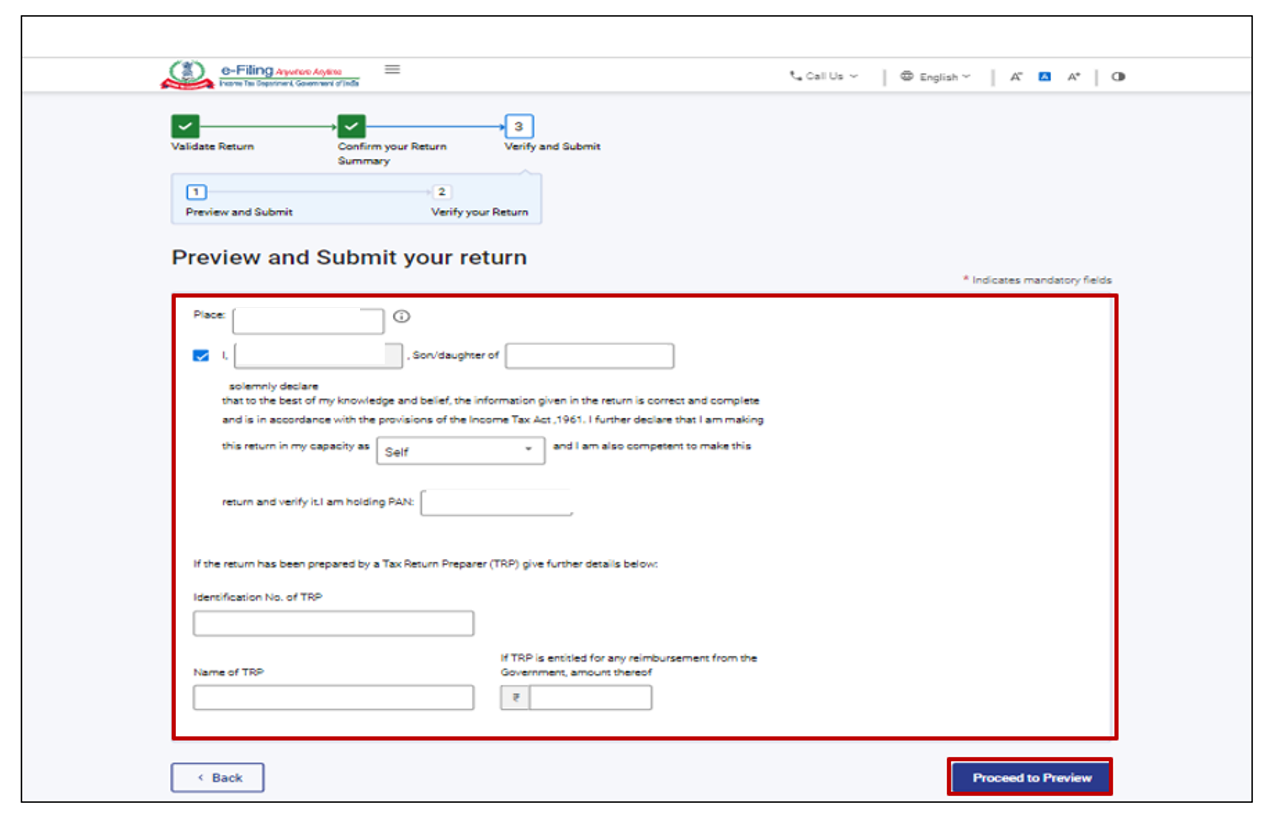
Leave the TRP box blank if you have not involved any tax return preparer in preparing your return.
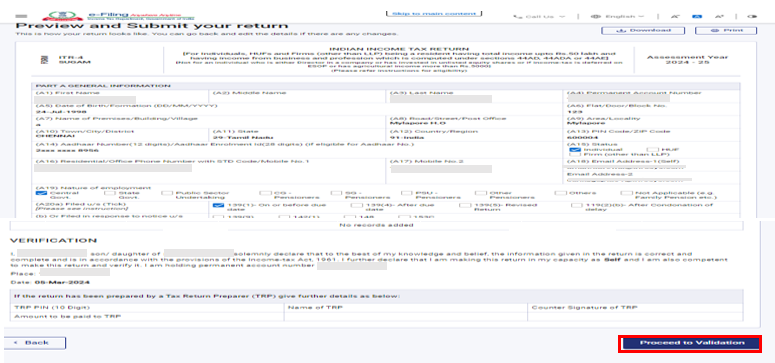
Step 14: Take a look at your return by previewing it, and click on ‘Proceed to Validate‘
Step 15: After validating, verify your return by clicking on ‘Proceed to Verification‘.
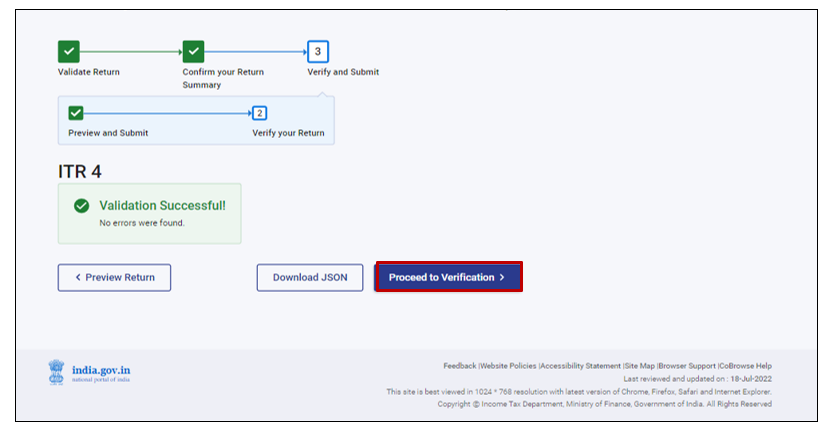
If there are any errors, you will see a list of validation errors in your return. You will have to correct the errors by going back to the form. If there are no errors, continue by clicking ‘proceed to verification‘
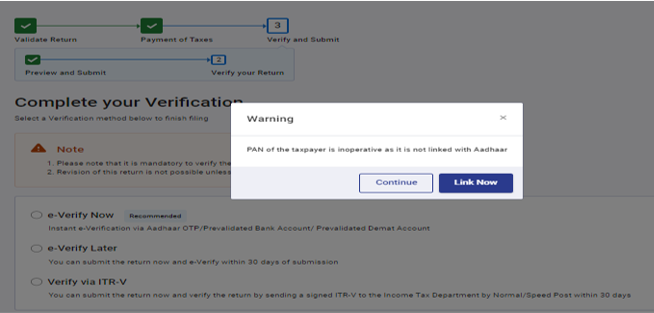
Step 16: On the Complete your verification page, choose the option you prefer and click on continue.
It is compulsory to verify your details, and e-verification is the fastest and easiest way to verify your ITR.

If your PAN is inoperative, the screen will display a warning message about the same. You can link PAN with Aadhaar by selecting ‘Link Now‘ option, else you can click on continue.
If you have chosen to verify your return later (e-verify later), you can submit your return, but you will need to verify it within 30 days of filing your ITR.
Step 17: On the page of e-verification, opt for the option by which you want to e-verify the return and click ‘continue‘.
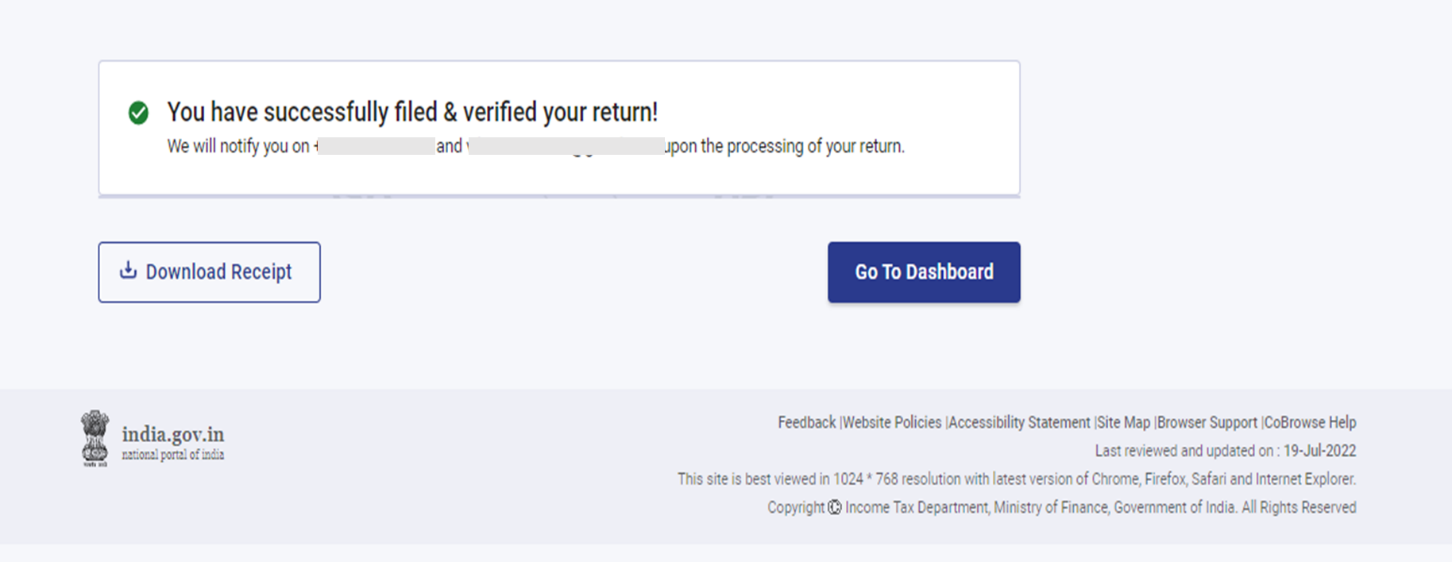
After the e-verification, a success message will pop up on your screen along with the Transaction ID and the Acknowledgement number. You will also get a confirmation message on your mobile number and the email ID registered on the e-Filing portal.
Hope you have filed this helpful.